
How to run MiniMax H3 locally in ComfyUI
Written by Clement
MiniMax H3 is the open-weights release of MiniMax's third-generation video model (the same lineage behind Hailuo). MiniMax open-sourced it on August 3, 2026 under its own community license, and ComfyUI shipped native day-zero support the same day: four new nodes and six official templates, merged straight into Comfy-Org/ComfyUI. Under the hood it's a 33.1B-parameter dense omni transformer driven by a Qwen3-VL-32B text encoder, generating up to 15 seconds of 24fps video with native 32kHz stereo audio in one pass. Text, image, or a full set of reference images/video/audio all go in as context; video and sound come out together.
This is the setup we ran ourselves: pruned FP8/INT8 builds so it fits on a consumer GPU, and all three official workflows (Text-to-Video, Image-to-Video, Reference-to-Video). Before you download anything, read the callout right below. MiniMax's license puts a real restriction on where you're allowed to run these weights, and it's easy to miss if you're used to fully permissive open weights.
What you're installing
The headline spec that matters for a local setup: MiniMax's own numbers put full-precision H3 at 123.6 GB. Pruning the modulation weights (about 40% of the parameters) into a lookup table and quantizing the rest gets the smallest variants down to roughly 42.5 GB, a 66% cut, which is what makes an RTX 3060-class card viable at all (with dynamic VRAM offloading on). The FP8 and INT8 builds this guide uses sit in that reduced range.
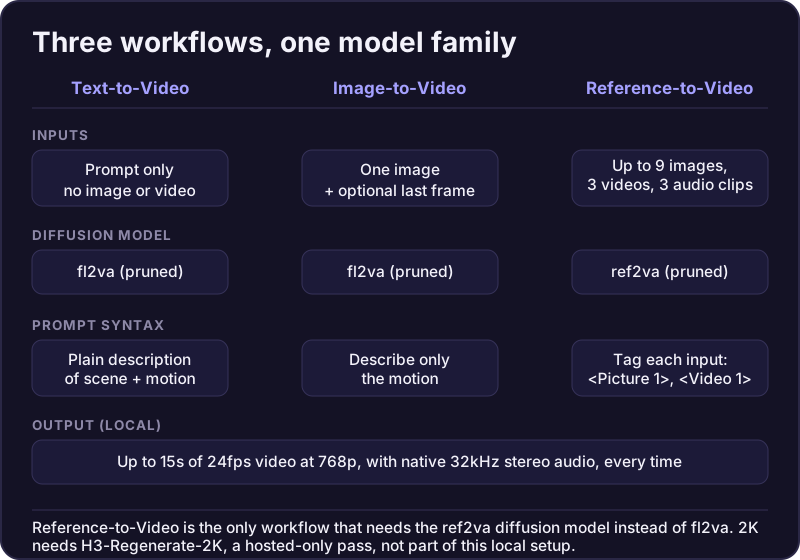
Two diffusion models exist, and you only need one pair, not both: fl2va handles Text-to-Video and Image-to-Video, ref2va handles Reference-to-Video. Both come in matching pruned FP8 and INT8-convrot variants. You'll need ComfyUI 0.30.0 or newer since that's the first version with native H3 node support.
One resolution caveat that's easy to miss: what you're installing here caps out at 768p (short edge, up to 768x1344). The "up to 2K" figure in MiniMax's own marketing comes from H3-Regenerate-2K, a separate pass that takes a finished 768p clip and re-renders it at 2K using the original context. That module isn't part of the open-weights release; it only runs through MiniMax's hosted API. Nothing in this guide gets you local 2K.
Update ComfyUI and get the templates
- 1
Update ComfyUI
Open your ComfyUI installation folder, go into the update folder, and run update_comfyui.bat. You need at least ComfyUI 0.30.0 for the native MiniMax H3 nodes to show up at all.
- 2
Load the templates
Launch ComfyUI, open the Templates sidebar on the left, and search "MiniMax H3". Six official workflow templates ship in this batch; if search comes up empty, download them directly from the Comfy-Org/MiniMax-H3 page on Hugging Face and drop them into your templates folder.
Model files to download, and where they go
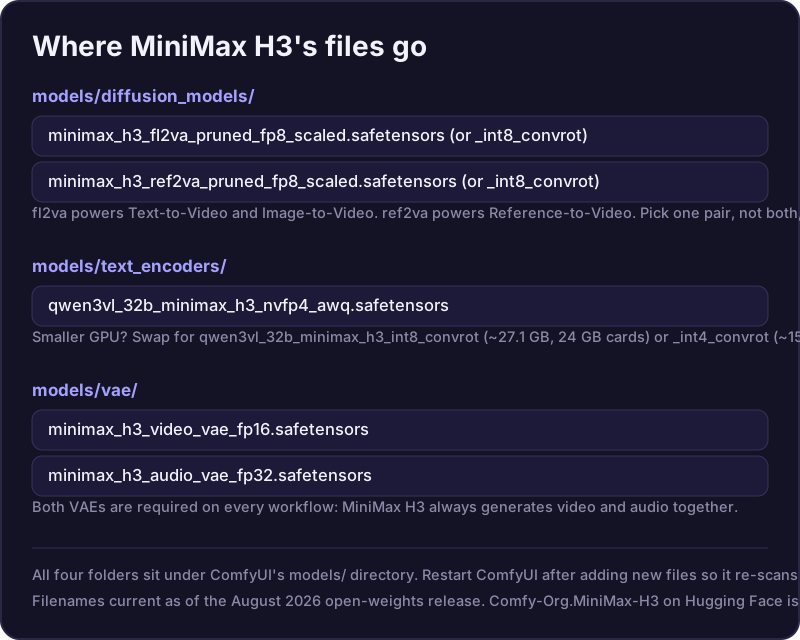
Every workflow needs the text encoder and both VAEs. Which diffusion model you add depends on which workflow you're building toward.
- Diffusion (Text/Image-to-Video)
- minimax_h3_fl2va_pruned_fp8_scaled.safetensors, or _int8_convrot → models/diffusion_models/
- Diffusion (Reference-to-Video)
- minimax_h3_ref2va_pruned_fp8_scaled.safetensors, or _int8_convrot → models/diffusion_models/
- Text encoder
- qwen3vl_32b_minimax_h3_nvfp4_awq.safetensors → models/text_encoders/ (swap for _int8_convrot on a 24 GB card, _int4_convrot on 16 GB)
- Video VAE
- minimax_h3_video_vae_fp16.safetensors → models/vae/
- Audio VAE
- minimax_h3_audio_vae_fp32.safetensors → models/vae/ (required even if you don't care about sound; H3 always generates it)
Workflow 1: Text-to-Video
No image or reference needed here: the model builds the whole scene from your prompt.
- 3
Load the template
In Templates, search "MiniMax H3: Text to Video" and open it.
- 4
Point the model nodes at your files
Load Diffusion Model → the fl2va FP8 or INT8 file you downloaded. Load CLIP → the Qwen3VL text encoder. Load VAE → map both the audio and video VAE nodes; H3's audio and video always render together, so both are mandatory even on a workflow you think of as silent.
- 5
Set resolution and duration
Resolution Selector: pick your aspect ratio and a megapixel target. The model's native canvas is a 768px short edge (max 768x1344), and the node rounds to the nearest 32-pixel multiple automatically. Duration snaps to H3's 17-frame block grid at 24fps; the template ships at a fast preview size, and full quality costs roughly 1.0 megapixel at 16:9.
- 6
Write your prompt and run
Describe the full scene, subject, and motion in the prompt box (there's no image to lean on here, so be specific), then Queue Prompt. The finished clip, audio included, lands in output/video/.
Workflow 2: Image-to-Video
Same models as Text-to-Video, but the scene comes from your image instead of your words.
- 7
Load the template
Search "MiniMax H3: Image to Video" in Templates, and make sure you grab the version without an "API" tag; that variant calls MiniMax's hosted endpoint instead of your local install.
- 8
Match your models
Same three model nodes as Text-to-Video: fl2va diffusion model, Qwen3VL CLIP, both VAEs.
- 9
Upload your image and scale it
Load Image → your source frame. Use Image Size → scales it proportionally to your target megapixels and aspect ratio, so you don't feed the model an off-spec resolution. This template also accepts an optional last-frame keyframe if you want the model to interpolate toward a specific end point rather than just extrapolate motion.
- 10
Prompt the motion and run
Describe what should move (not the scene; the image already has that), then Queue Prompt.
Get new guides by email
One email when we publish new guides and model breakdowns. No spam, unsubscribe anytime.
Workflow 3: Reference-to-Video
The multi-input workflow: up to 9 reference images, 3 reference videos, and 3 standalone audio clips in one generation. This is the one that needs a different diffusion model.
- 11
Load the template
Search "MiniMax H3: Reference to Video" and open it.
- 12
Load the correct diffusion model
This is the step people skip: Reference-to-Video needs ref2va, not fl2va. Point Load Diffusion Model at minimax_h3_ref2va_pruned_fp8_scaled.safetensors (or its int8_convrot equivalent). Text encoder and VAE nodes stay the same as the other two workflows.
- 13
Add your references
Load Image and Load Video (Upload) nodes for your source assets, up to 9 images and 3 videos. Only need one image instead of two? Select the unused image node and press Ctrl+B to bypass it rather than deleting it. Load Audio (Upload) is optional, up to 3 clips, if you want the video's motion synced to music or speech.
- 14
Tag your references in the prompt
Reference each input in your prompt using tags in the exact order you connected them: <Picture 1>, <Picture 2>, <Video 1>, <Audio 1>. The model resolves the tag by connection order, not by filename, so double-check the node graph if a tag pulls the wrong asset.
- 15
Run it
Queue Prompt to synthesize the reference-guided clip with its integrated audio.
What our own first run confirmed
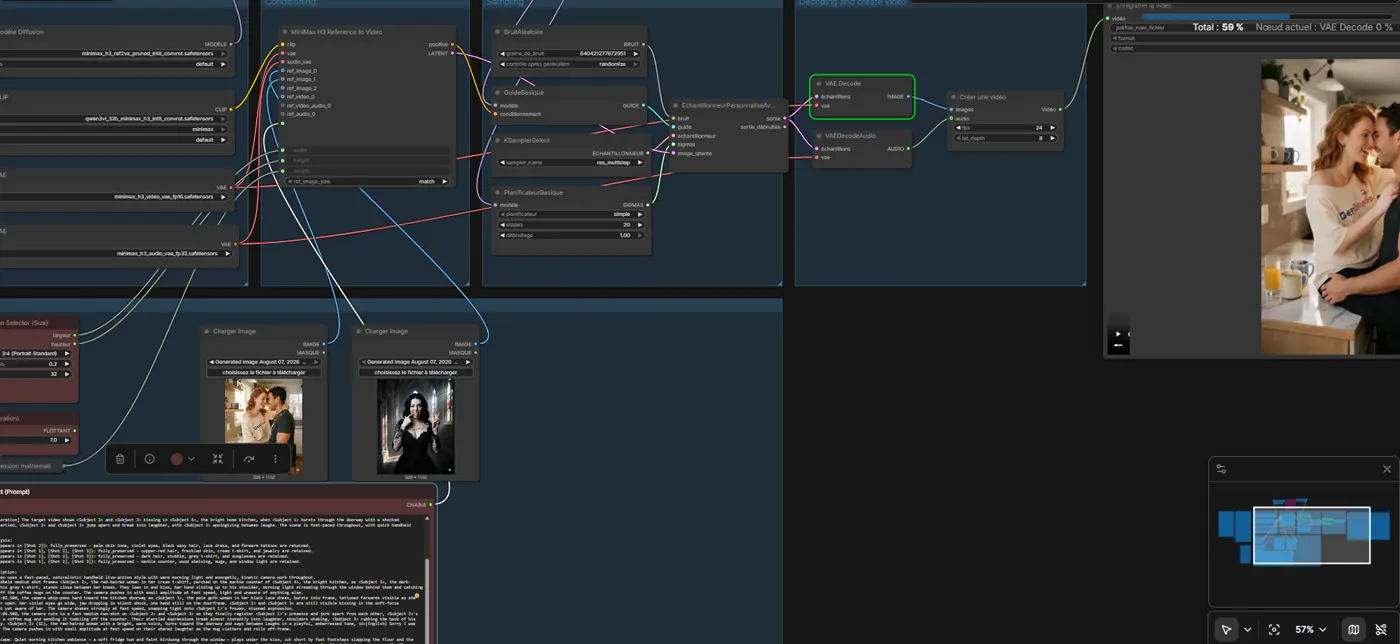
The screenshot and clip above are our first real Reference-to-Video generation, not a mockup. It confirms a few things the spec sheet alone doesn't: the ref2va INT8-convrot diffusion model runs end to end with the INT8-convrot Qwen3VL text encoder, two reference images fed through Charger Image nodes, and Ctrl+B bypassing the unused third image slot exactly as described above. The output landed at 800x1056 for a 3:4 portrait request (a 32-pixel multiple, same rounding behavior the Resolution Selector node is supposed to do, just not exactly the 768px figure MiniMax quotes for 16:9). It ran 10.1 seconds, inside the 4-15s window, and the audio track came back genuine 32kHz stereo AAC, not silent or a lower rate, so the native-audio claim holds up on our own hardware.
On the numbers people actually ask for: we ran this on an A40 (48GB VRAM, 50GB system RAM), and a 10-second clip at 720p (upscaled with the enhancer pass, not native) used about 38GB of that and took roughly 5 minutes. And yes, int8 visibly beat fp8 at that resolution on our own eyes, consistent with what the community has been reporting.
Rendering past the clip limit
The setup above gets you a clip in the range H3 generates natively. Length is the next wall people hit, and the workaround that got the most attention this summer is a community sampler that renders continuously instead of one fixed-length pass, with the claim that it holds at 1080p on a 16 GB card.
That claim is worth understanding precisely, because it is a different mechanism from the frame chaining we describe in our guide on how to make longer AI videos. Chaining renders a clip, takes its last frame, and starts a new clip from it, which is why quality drifts: each handoff frame carries forward the flaws of the one before it. A continuous sampler avoids the handoff, so in principle it avoids the compounding drift too.
In principle. Our own chaining experiments hit a practical ceiling around forty seconds before color drift became visible, and that number came from running it, not from reading about it. We ran the endless sampler ourselves too, though not on the 16GB card the claim is made for: on a 24GB RTX 4090, quality stayed stable well past where chaining starts to drift, without the segment-to-segment color shift chaining shows. It did not sail through cleanly, though. We hit out-of-memory kills more than once, on a card with 8GB more headroom than the claim targets, so treat the 16GB figure as optimistic until you have confirmed it holds on your own hardware.
Frequently asked questions
- Can MiniMax H3 render videos of any length?
- Not in a single native pass, but a community endless sampler gets you close. It renders continuously instead of one fixed-length pass, and unlike frame chaining, it doesn't restart each segment from a finished frame, so it avoids chaining's compounding color drift. We ran it ourselves and quality held up well past the roughly forty-second point where our own chaining starts to shift. The widely-shared claim is that it runs on 16GB of VRAM; we tested on a 24GB card and still hit occasional out-of-memory kills, so treat 16GB as optimistic until you've confirmed it on your own hardware.
- Is MiniMax H3 free to use commercially?
- Yes, up to $20M/year in revenue from commercial products or services that use it, with no fee. Past that threshold you need prior written authorization from MiniMax, and any commercial product using H3 must display "MiniMax H3" on its interface either way.
- Can I run MiniMax H3 locally in the US, EU, UK, or South Korea?
- Not under the community license as written: those four are explicitly excluded from its "Applicable Territory," and local deployment outside that territory isn't licensed. MiniMax invites people in those regions to contact them (api@minimax.io) about a separate agreement. Their hosted API, by contrast, is available globally regardless of this restriction.
- How much VRAM does MiniMax H3 need?
- The pruned, quantized builds this guide uses bring the full 123.6 GB model down to roughly 42.5 GB at the smallest tier, and MiniMax cites something like an RTX 3060 as workable with dynamic VRAM offloading turned on. Match your text-encoder file to your card: nvfp4 for the least VRAM, int8_convrot around 24 GB cards, int4_convrot around 16 GB.
- Should I use the FP8 or INT8 diffusion model?
- INT8-convrot is the safer default if your GPU has the room. Early testing across the community shows it holding motion and object shape better through fast pans than the more aggressively quantized nvfp4 path, at the cost of a larger file. FP8 is the fallback when INT8's footprint doesn't fit.
- Can this local setup generate 2K video?
- No. The open-weights model caps at 768p locally. Full 2K comes from H3-Regenerate-2K, a hosted-only pass on MiniMax's API that re-renders a finished 768p clip at higher resolution; it isn't part of the ComfyUI nodes or the files in this guide. If you need 2K, that means the hosted API, not a local install.
- Is it cheaper to just use MiniMax's hosted API instead of running this locally?
- For occasional use, often yes: MiniMax's own API prices H3 at roughly $0.08/second at 768p and $0.13/second at 2K (about $1.20 and $1.95 for a 15-second clip), with no GPU or setup required. Running it locally makes more sense once you're generating enough volume that the electricity and your GPU's amortized cost undercut per-second API billing, or when you specifically need the license's local-use terms rather than the API's.
Keep reading
How to generate videos with Wan 2.5
What changed in Wan 2.5 versus 2.2, including native audio, and how to get the most out of it for image-to-video: the new settings worth touching, when the upgrade helps, and when it doesn't.
How to generate videos with Wan 2.7
A practical guide to Wan 2.7 image-to-video: clips up to about fifteen seconds, built-in prompt optimization, and refined native audio. What the model adds over 2.5, how to prompt sound, and how to script a longer clip so it holds together.
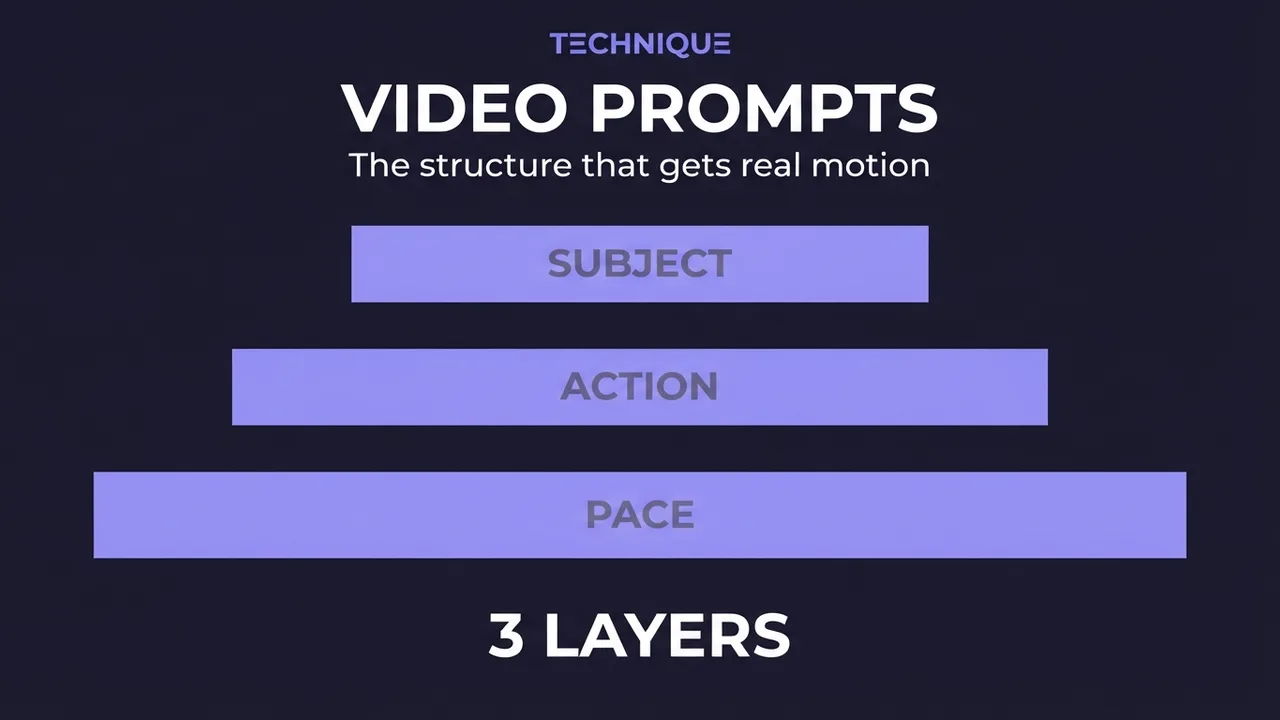
How to write prompts for AI video generation
The prompt structure that works for AI video: why motion prompts are different from image prompts, the present-progressive rule, and the specific phrasing that gets you believable movement instead of a warped photo.
How to make longer AI videos: 4 methods that work
AI video models cap out at a few seconds. Here are the 4 methods that extend them: chaining clips, last-frame continuation, and keeping motion consistent across every join. Step by step, free.
How much does AI video generation cost?
A clear breakdown of what AI video costs: per-second pricing, why resolution and audio change the bill, how to estimate a clip before you generate it, the free local alternative, and where the hidden costs like upscaling hide.
How to fix flickering AI video: 4 causes and fixes
AI video that flickers, shimmers, or morphs between frames has 4 usual causes. Here's how to diagnose and fix each one: source-image noise, too-few steps, over-long clips, and unstable prompts. Step by step.
Get new guides by email
One email when we publish new guides and model breakdowns. No spam, unsubscribe anytime.